"modern" OS Deployment (mOSD)

"Modern" also means simplified, that's why I will give you an example on how to setup Windows 10 with just the original source (ISO) and a few scripts… Like in the "old" days, where unattended setup was the standard way to setup an OS.
All the files of this "example" are published on: https://github.com/rzander/mOSD
Quick Start
If you want to see mOSD (modern OSD) in action, just do:
- download the original Windows 10 ISO (MSDN or VL Portal)
- extract the ISO to your disk (or mount the ISO and copy the content to a writable Directory)
- download mOSD.exe from https://github.com/rzander/mOSD/releases/latest and copy it into the extracted ISO folder.
- run mOSD.exe to extract the content from the file.
- rename autounattend_[your language].xml to autounattend.xml.
- start rzTools\CreateISO.cmd as admin to create a new c:\W10.iso
- use rzTools\rufus.exe to create a bootable USB stick from the c:\W10.iso
- boot W10.ISO or the created USB Stick...
Note: The system will automatically power off at the end of the setup before OOBE is starting.
Why do we need that?
Because it's:
- super fast (Win10, Office356, 7-Zip, AdobeReader, Chrome, VSCode … in less than 15min on a VM)
- independent
- loads all files from a local media (USB) and/or internet
- does not require any Servers -> great for Disaster-Recovery scenarios
- independent of the OS Build, and Language
- Out of the box
- useful to reproduce Issues from Corp. Images (without any GPO's etc.)
- performance benchmarks (compare an OutOfBox W10 vs your corporate W10)
- Easy to create
- just follow the [Quick Start](#Quick Start) guide.
- fully unattended
- An end user will be able to rebuild a client.
Unattended Setup
Windows is using an XML-File to control the setup of the Operating System. If you place an "autounattend.xml" file in the root directory of the original Win10 source, that file will be used to automate the original windows setup.
To generate an unattend XML from scratch, the Tool "Windows System Image Manager" from ADK can be used or you can download the mOSD example file: autounattend_EN.xml.
Setup Phases
The unattended file contains the customizations for all the phases of an Operating System setup:
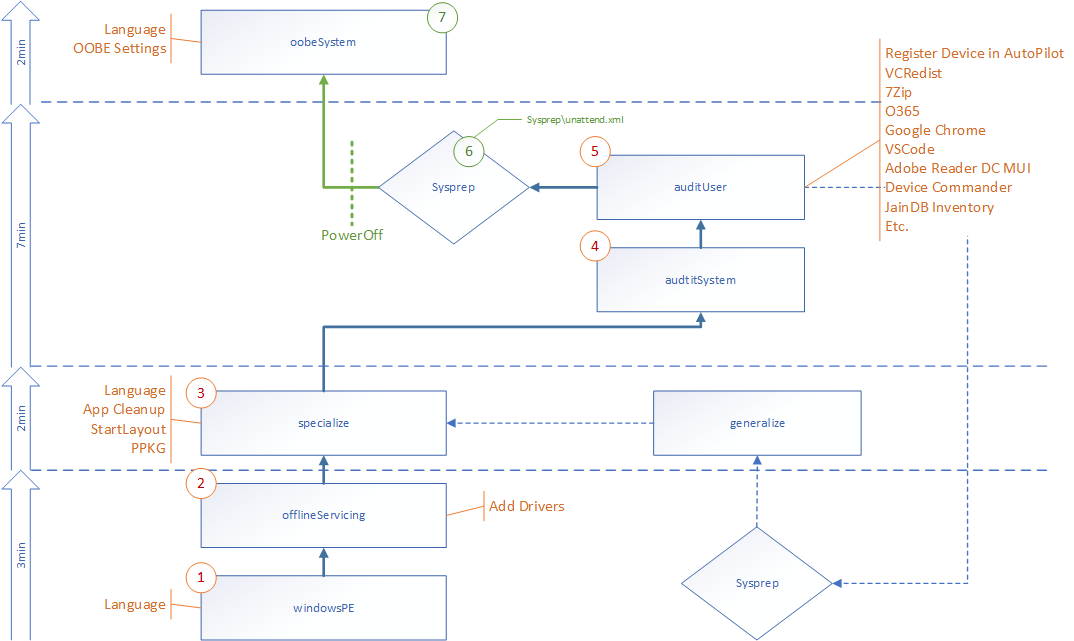
windowsPE
The first phase loaded from WinPE when starting the setup. This section contains the instructions for:
- Disk partitioning
- Keyboard/Locale settings during WinPE
- Win10 License (Home/Pro/Enterprise etc.)
- EULA
The following example will setup "Windows 10 Enterprise" with a standard UEFI Disk layout. To suppress the initial language selection dialog, you have to specify language and locale settings in the XML.
Note: UILanguage and SetupUILanguage must match with the Language of the Windows10 Source. E.g. you can not setup a German Win10 with a UILanguage = en-US
    <settings pass="windowsPE">
        <component name="Microsoft-Windows-International-Core-WinPE" processorArchitecture="amd64" publicKeyToken="31bf3856ad364e35" language="neutral" versionScope="nonSxS"
            xmlns:wcm="http://schemas.microsoft.com/WMIConfig/2002/State"
            xmlns:xsi="http://www.w3.org/2001/XMLSchema-instance">
            <SetupUILanguage>
                <UILanguage>en-US</UILanguage>
            </SetupUILanguage>
            <InputLocale>0807:00000807</InputLocale>
            <UILanguage>en-US</UILanguage>
            <UserLocale>de-CH</UserLocale>
            <SystemLocale>en-US</SystemLocale>
        </component>
        <component name="Microsoft-Windows-Setup" processorArchitecture="amd64" publicKeyToken="31bf3856ad364e35" language="neutral" versionScope="nonSxS"
            xmlns:wcm="http://schemas.microsoft.com/WMIConfig/2002/State"
            xmlns:xsi="http://www.w3.org/2001/XMLSchema-instance">
            <DiskConfiguration>
                <Disk wcm:action="add">
                    <CreatePartitions>
                        <CreatePartition wcm:action="add">
                            <Order>1</Order>
                            <Size>300</Size>
                            <Type>Primary</Type>
                        </CreatePartition>
                        <CreatePartition wcm:action="add">
                            <Order>2</Order>
                            <Size>100</Size>
                            <Type>EFI</Type>
                        </CreatePartition>
                        <CreatePartition wcm:action="add">
                            <Order>3</Order>
                            <Size>128</Size>
                            <Type>MSR</Type>
                        </CreatePartition>
                        <CreatePartition wcm:action="add">
                            <Order>4</Order>
                            <Extend>true</Extend>
                            <Type>Primary</Type>
                        </CreatePartition>
                    </CreatePartitions>
                    <ModifyPartitions>
                        <!-- Windows RE Tools partition -->
                        <ModifyPartition wcm:action="add">
                            <Order>1</Order>
                            <PartitionID>1</PartitionID>
                            <Label>WinRE</Label>
                            <Format>NTFS</Format>
                            <TypeID>de94bba4-06d1-4d40-a16a-bfd50179d6ac</TypeID>
                        </ModifyPartition>
                        <!-- System partition (ESP) -->
                        <ModifyPartition wcm:action="add">
                            <Order>2</Order>
                            <PartitionID>2</PartitionID>
                            <Label>System</Label>
                            <Format>FAT32</Format>
                        </ModifyPartition>
                        <!-- Windows partition -->
                        <ModifyPartition wcm:action="add">
                            <Order>3</Order>
                            <PartitionID>4</PartitionID>
                            <Label>Windows</Label>
                            <Letter>C</Letter>
                            <Format>NTFS</Format>
                        </ModifyPartition>
                    </ModifyPartitions>
                    <DiskID>0</DiskID>
                    <WillWipeDisk>true</WillWipeDisk>
                </Disk>
                <WillShowUI>OnError</WillShowUI>
            </DiskConfiguration>
            <ImageInstall>
                <OSImage>
                    <InstallTo>
                        <DiskID>0</DiskID>
                        <PartitionID>4</PartitionID>
                    </InstallTo>
                    <WillShowUI>OnError</WillShowUI>
                    <InstallFrom>
                        <MetaData wcm:action="add">
                            <Key>/image/name</Key>
                            <Value>Windows 10 Enterprise</Value>
                        </MetaData>
                    </InstallFrom>
                </OSImage>
            </ImageInstall>
            <UserData>
                <AcceptEula>true</AcceptEula>
                <ProductKey>
                    <Key></Key>
                    <WillShowUI>OnError</WillShowUI>
                </ProductKey>
            </UserData>
        </component>
    </settings>
offlineservicing
offlineservicing is still running under WinPE, but after the install.wim was extracted.
The phase is the place if you have to integrate any offline updates or drivers.
In this example we register C:\Drivers, D:\Drivers and E:\Drivers as an external driver path, so Windows will check these directories for additional PnP drivers during setup.
This allows to keep the drivers on the external USB drive. There is no need to copy all the content to the local disk, except drivers that are used for disconnected devices.
Note: Windows setup will try to access the Microsoft Driver Catalog (Internet) to download known drivers automatically. Do not overcomplicate driver management; only use local drivers if really required.
Hint: Export all drivers from an existing device to your USB drive:
Export-WindowsDriver -Online -Destination {Your USB Stick}:\Drivers
<settings pass="offlineServicing">
    <component name="Microsoft-Windows-PnpCustomizationsNonWinPE" processorArchitecture="amd64" publicKeyToken="31bf3856ad364e35" language="neutral" versionScope="nonSxS"
        xmlns:wcm="http://schemas.microsoft.com/WMIConfig/2002/State"
        xmlns:xsi="http://www.w3.org/2001/XMLSchema-instance">
        <DriverPaths>
            <PathAndCredentials wcm:action="add" wcm:keyValue="1">
                <Credentials />
                <Path>C:\Drivers</Path>
            </PathAndCredentials>
            <PathAndCredentials wcm:action="add" wcm:keyValue="2">
                <Credentials />
                <Path>D:\Drivers</Path>
            </PathAndCredentials>
            <PathAndCredentials wcm:action="add" wcm:keyValue="3">
                <Credentials />
                <Path>E:\Drivers</Path>
            </PathAndCredentials>
        </DriverPaths>
    </component>
</settings>
specialize
In this phase, Windows is starting up for the first time. So you can do things like:
- Configure Language/Locale/Time-Zone settings
- Owner/Organization
- IE Settings etc.
- remove preinstalled apps
- apply default start layout
Note: As Windows is in an early phase, software installations may fail…
This example requires some additional files. Integration of additional files and folders will be explained later in this document…
This example triggers a script (PolicyPPKG.ps1) which does search and install a provisioning package named mOSD.ppkg in the root of all drives. Just rename the mOSD.ppkg on your USB drive to skip that package.
Note: only code signed provisioning packages can be installed silently.
<settings pass="specialize">
    <component name="Microsoft-Windows-IE-InternetExplorer" processorArchitecture="amd64" publicKeyToken="31bf3856ad364e35" language="neutral" versionScope="nonSxS"
        xmlns:wcm="http://schemas.microsoft.com/WMIConfig/2002/State"
        xmlns:xsi="http://www.w3.org/2001/XMLSchema-instance">
        <LocalIntranetSites>*.contoso.intra</LocalIntranetSites>
        <Home_Page>https://ruckzuck.tools</Home_Page>
        <DisableFirstRunWizard>true</DisableFirstRunWizard>
    </component>
    <component name="Microsoft-Windows-Shell-Setup" processorArchitecture="amd64" publicKeyToken="31bf3856ad364e35" language="neutral" versionScope="nonSxS"
        xmlns:wcm="http://schemas.microsoft.com/WMIConfig/2002/State"
        xmlns:xsi="http://www.w3.org/2001/XMLSchema-instance">
        <TimeZone>W. Europe Standard Time</TimeZone>
        <RegisteredOrganization>Zander Tools</RegisteredOrganization>
        <RegisteredOwner>R.Zander</RegisteredOwner>
    </component>
    <component name="Microsoft-Windows-International-Core" processorArchitecture="amd64" publicKeyToken="31bf3856ad364e35" language="neutral" versionScope="nonSxS"
        xmlns:wcm="http://schemas.microsoft.com/WMIConfig/2002/State"
        xmlns:xsi="http://www.w3.org/2001/XMLSchema-instance">
        <InputLocale>0807:00000807</InputLocale>
        <SystemLocale>en-US</SystemLocale>
        <UserLocale>de-CH</UserLocale>
    </component>
    <component name="Microsoft-Windows-Deployment" processorArchitecture="amd64" publicKeyToken="31bf3856ad364e35" language="neutral" versionScope="nonSxS"
        xmlns:wcm="http://schemas.microsoft.com/WMIConfig/2002/State"
        xmlns:xsi="http://www.w3.org/2001/XMLSchema-instance">
        <RunSynchronous>
            <RunSynchronousCommand wcm:action="add">
                <Path>powershell.exe -noprofile -command set-executionpolicy bypass -force</Path>
                <Order>1</Order>
                <Description>PowerShell Execution Policy...</Description>
            </RunSynchronousCommand>
            <RunSynchronousCommand wcm:action="add">
                <Path>powershell.exe -noprofile -File c:\windows\setup\scripts\removeapps.ps1</Path>
                <Order>2</Order>
                <Description>Cleaning preinstalled Apps...</Description>
            </RunSynchronousCommand>
            <RunSynchronousCommand wcm:action="add">
                <Path>powershell.exe -noprofile -File c:\windows\setup\scripts\StartLayout.ps1</Path>
                <Order>3</Order>
                <Description>Setting Start-Layout...</Description>
            </RunSynchronousCommand>
            <RunSynchronousCommand wcm:action="add">
                <Order>4</Order>
                <Description>Installing Provisioning Package...</Description>
                <Path>powershell.exe -noprofile -File c:\windows\setup\scripts\PolicyPPKG.ps1</Path>
                <WillReboot>Never</WillReboot>
            </RunSynchronousCommand>
        </RunSynchronous>
    </component>
    <component name="Microsoft-Windows-TPM-Tasks" processorArchitecture="amd64" publicKeyToken="31bf3856ad364e35" language="neutral" versionScope="nonSxS"
        xmlns:wcm="http://schemas.microsoft.com/WMIConfig/2002/State"
        xmlns:xsi="http://www.w3.org/2001/XMLSchema-instance">
        <ClearTpm>1</ClearTpm>
    </component>
</settings>
oobesystem (1st)
After the "specialize" section, we shortly touch oobesystem (oobsystem will be fired again, after sysprep but with another answer file).
We just have to tell the setup to switch in "Audit" mode:
<settings pass="oobeSystem">
    <component name="Microsoft-Windows-Deployment" processorArchitecture="amd64" publicKeyToken="31bf3856ad364e35" language="neutral" versionScope="nonSxS"
        xmlns:wcm="http://schemas.microsoft.com/WMIConfig/2002/State"
        xmlns:xsi="http://www.w3.org/2001/XMLSchema-instance">
        <Reseal>
            <Mode>Audit</Mode>
            <ForceShutdownNow>false</ForceShutdownNow>
        </Reseal>
    </component>
</settings>
auditsystem
AuditSystem is defined to install software under the System context.
As we do not have any SW to install as System, this section is not required (in our example).
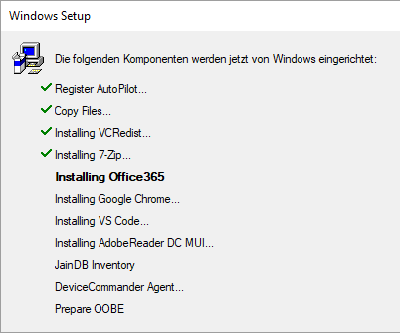
audituser
In this phase, Windows will do an autologon in the background with the default "Administrator" account. All the settings from this account can be converted into the default user profile. That's why we install all the Software in this phase.
<settings pass="auditUser">
<component name="Microsoft-Windows-Deployment" processorArchitecture="amd64" publicKeyToken="31bf3856ad364e35" language="neutral" versionScope="nonSxS"
xmlns:wcm="http://schemas.microsoft.com/WMIConfig/2002/State"
xmlns:xsi="http://www.w3.org/2001/XMLSchema-instance">
<RunSynchronous>
<RunSynchronousCommand wcm:action="add">
<Order>1</Order>
<Path>powershell.exe -noprofile -File c:\windows\setup\scripts\AutoPilot.ps1</Path>
<WillReboot>Never</WillReboot>
<Description>Register AutoPilot...</Description>
</RunSynchronousCommand>
<RunSynchronousCommand wcm:action="add">
<Description>Copy Files...</Description>
<Path>powershell.exe -noprofile -command move-item c:\windows\temp\* $env:temp;exit(0)</Path>
<Order>2</Order>
</RunSynchronousCommand>
<RunSynchronousCommand wcm:action="add">
<Description>Installing VCRedist...</Description>
<Path>"%programFiles%\zander tools\RZUpdate.exe" "VCRedist2013x64";"VCRedist2013x86";"VCRedist2017x64";"VCRedist2017x86";"RuckZuck provider for OneGet"</Path>
<Order>3</Order>
</RunSynchronousCommand>
<RunSynchronousCommand wcm:action="add">
<Description>Installing 7-Zip...</Description>
<Path>"%programFiles%\zander tools\RZUpdate.exe" "7-Zip"</Path>
<Order>4</Order>
<WillReboot>Never</WillReboot>
</RunSynchronousCommand>
<RunSynchronousCommand wcm:action="add">
<Order>5</Order>
<Path>powershell.exe -noprofile -File c:\windows\setup\scripts\Office.ps1</Path>
<Description>Installing Office365</Description>
<WillReboot>Never</WillReboot>
</RunSynchronousCommand>
<RunSynchronousCommand wcm:action="add">
<Order>6</Order>
<Path>"%programFiles%\zander tools\RZUpdate.exe" "Google Chrome"</Path>
<Description>Installing Google Chrome...</Description>
</RunSynchronousCommand>
<RunSynchronousCommand wcm:action="add">
<Order>7</Order>
<Path>"%programFiles%\zander tools\RZUpdate.exe" "Code"</Path>
<Description>Installing VS Code...</Description>
</RunSynchronousCommand>
<RunSynchronousCommand wcm:action="add">
<Order>8</Order>
<Path>"%programFiles%\zander tools\RZUpdate.exe" "AdobeReader DC MUI"</Path>
<Description>Installing AdobeReader DC MUI...</Description>
</RunSynchronousCommand>
<RunSynchronousCommand wcm:action="add">
<Order>9</Order>
<Path>powershell.exe -noprofile -command "& { Invoke-RestMethod -Uri "https://jaindb.azurewebsites.net/getps" | Invoke-Expression }"</Path>
<WillReboot>Never</WillReboot>
<Description>JainDB Inventory</Description>
</RunSynchronousCommand>
<RunSynchronousCommand wcm:action="add">
<Order>10</Order>
<Path>msiexec -i https://devcdr.azurewebsites.net/DevCDRAgent.msi INSTANCE=test /qn REBOOT=REALLYSUPPRESS</Path>
<WillReboot>Never</WillReboot>
<Description>DeviceCommander Agent...</Description>
</RunSynchronousCommand>
<RunSynchronousCommand wcm:action="add">
<Order>11</Order>
<Path>powershell.exe -noprofile -File c:\windows\setup\scripts\BootOOBE.ps1</Path>
<WillReboot>Never</WillReboot>
<Description>Prepare OOBE</Description>
</RunSynchronousCommand>
</RunSynchronous>
</component>
</settings>
Autopilot
For the case that the device will use Autopilot to simplify the OOBE part after Sysprep we use a script to register the device in Autopilot (/automatically-register-existing-device-in-autopilot).
RuckZuck
Most of the Software will be install with RZUpdate.exe which is an Open-Source tool to install Packages from RuckZuck.tools, a package repository for Windows. RZUpdate.exe will get the definition (.json file) and the required files from %TEMP%. If the files or definitions are missing in %Temp%, it will contact http://ruckzuck.tools and/or the software vendors web-site to download the content.
The installation runs under the Administrator account, that's why we copy all preloaded folders from c:\windows\temp to %TEMP%. This allows to reduce time and bandwidth as RZUpdate.exe will use the local files.
RZUpdate is not a requirement, if you know the URL's to download the software, you can do it also in a PowerShell... But with RuckZuck, you always get the latest version with no effort.
Office 365
To install O365, we use a PowerShell script that does a search for an 'Office\setup.exe' on all external devices. If found, it triggers $proc = (Start-Process "setup.exe" -ArgumentList "/configure .\configuration.xml" -Wait -PassThru); $proc.WaitForExit()
That means, if we place a such a Folder (Office) in the root of the installation source,
the Office installation will be started from there…
For a basic setup, you just need the setup.exe from Office 365 with a configuration.xml like this:
<Configuration>
    <Add OfficeClientEdition="64" Channel="Deferred">
        <Product ID="O365ProPlusRetail">
	    <Language ID="MatchOS" />
            <ExcludeApp ID="Publisher" />
            <ExcludeApp ID="Groove" />
            <ExcludeApp ID="Access" />
        </Product>
    </Add>
    <Logging Level="Standard" />
    <Display Level="None" AcceptEULA="TRUE" />
</Configuration>
This will download and install O365ProPlus x64 in the language of the OS.
In case of a slow internet connection or a mass deployment, you can also preload the files from O365 on the USB/ISO. Therefore, we need an additional xml file and a Batch to trigger the download of the O365 source. The "Office" directory in the example looks like:

Note: In my tests, Office did not install if device had no network (complete offline)...
To preload Office, just start ReDownload.cmd ("%~dp0setup.exe" /download "%~dp0download.xml") to download the O365 sources for the languages defined in download.xml:
<Configuration>
    <Add OfficeClientEdition="64" Channel="Deferred">
        <Product ID="O365ProPlusRetail">
            <Language ID="de-de" />
	    <Language ID="en-us" />
	    <Language ID="fr-fr" />
	    <Language ID="it-it" />
            <ExcludeApp ID="Publisher" />
            <ExcludeApp ID="Groove" />
            <ExcludeApp ID="Access" />
        </Product>
    </Add>
    <Logging Level="Standard" />
    <Display Level="None" AcceptEULA="TRUE" />
</Configuration>
JainDB
During the initial setup we trigger an Inventory of the device by using JainDB, a Blockchain based data-warehouse...
Device Commander
To management the devices, we setup DevCDR, a lightweight System-Management Agent which allows to manage the devices as soon as they have internet connection.
Boot OOBE
Once all the Software is installed, we enforce OOBE on next reboot and shut down the computer by using sysprep.exe /oobe /shutdown /unattend:c:\windows\system32\sysprep\unattend.xml.
oobesystem (2nd)
As we do not want to use the existing "oobeSystem" of the autounattend.xml, we enforce sysprep to use another unattend.xml:
<?xml version="1.0" encoding="utf-8"?>
<unattend xmlns="urn:schemas-microsoft-com:unattend">
    <settings pass="oobeSystem">
        <component name="Microsoft-Windows-International-Core" processorArchitecture="amd64" publicKeyToken="31bf3856ad364e35" language="neutral" versionScope="nonSxS" xmlns:wcm="http://schemas.microsoft.com/WMIConfig/2002/State" xmlns:xsi="http://www.w3.org/2001/XMLSchema-instance">
            <InputLocale>0807:00000807</InputLocale>
            <SystemLocale>en-US</SystemLocale>
            <UserLocale>de-CH</UserLocale>
        </component>
        <component name="Microsoft-Windows-Shell-Setup" processorArchitecture="amd64" publicKeyToken="31bf3856ad364e35" language="neutral" versionScope="nonSxS" xmlns:wcm="http://schemas.microsoft.com/WMIConfig/2002/State" xmlns:xsi="http://www.w3.org/2001/XMLSchema-instance">
            <OOBE>
                <ProtectYourPC>3</ProtectYourPC>
                <HideEULAPage>true</HideEULAPage>
                <HideOEMRegistrationScreen>true</HideOEMRegistrationScreen>
                <NetworkLocation>Work</NetworkLocation>
            </OOBE>
        </component>
    </settings>
    <settings pass="auditUser">
        <component name="Microsoft-Windows-Deployment" processorArchitecture="amd64" publicKeyToken="31bf3856ad364e35" language="neutral" versionScope="nonSxS" xmlns:wcm="http://schemas.microsoft.com/WMIConfig/2002/State" xmlns:xsi="http://www.w3.org/2001/XMLSchema-instance">
            <Reseal>
                <Mode>OOBE</Mode>
            </Reseal>
        </component>
    </settings>
    <cpi:offlineImage cpi:source="catalog://nuc1/dw10x/sources/install_windows 10 enterprise.clg" xmlns:cpi="urn:schemas-microsoft-com:cpi" />
</unattend>
To prevent end-users to boot from OOBE into audit mode to modify the system as Admin (by pressing CTRL+SHIFT+F3 in OOBE), we enforce the "auditUser" phase to reboot back into OOBE.
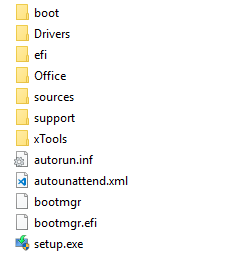
Folder structure
Windows can integrate custom folders and files during setup by using a $OEM$ Folder in the sources directory of the Windows media.
In this example, the following folder structure is used:

All folders starting with a $ will become "translated" during setup:
- $$ = C:\Windows
- $1 = C:\
- $Progs = C:\Program Files
The folders and files of this example are published on https://github.com/rzander/mOSD/tree/master/Win10_Sources or as a self-extracting executable mOSD.exe on https://github.com/rzander/mOSD/releases/latest
Install from USB drive
If you install all the content from an USB flash drive, make sure that the stick has a good read performance. Win10 itself will fit on a 8GB stick, but with Office and other tools you will need 16Gb or more…
For initial format, you should use the rufus.exe (rzTools folder) as it makes the stick bootable. If you are using NTFS as filesystem (recommended because install.wim can be greater than 4GB), Rufus will create two partitions, a UEFI bootable FAT32 and an NTFS partition with your sources.
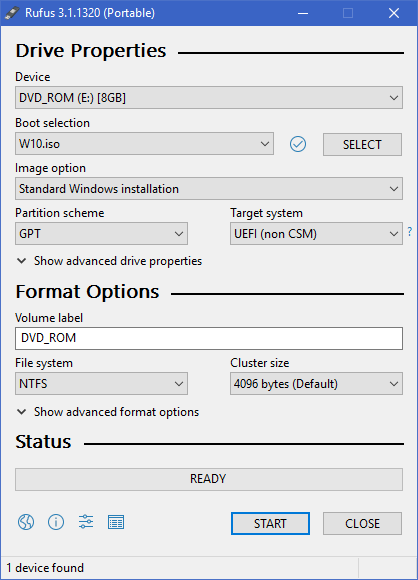
Hint: If you want to create a bootable SSD (fixed disc), press ALT+[F] to show also fixed drives.
Summary
All this is nothing new, but I forgot (because of ConfigMgr and MDT) how easy and fast a standard unattended setup of Windows10 can be. In combination with a cloud based Package-Repository (e.g. RuckZuck.tools) and with Autopilot, where the user only has to enter his email and password to "activate" the device, it's an super easy way to setup devices from scratch.
An I'm wondering more and more why we built some chunky Task-Sequences in the past which runs for hours… ?!